How To Hide Apps From Searching Windows 10

Do you have private or sensitive files and folders you don't want showing up in Windows 10 search results? Learn how to hide them from search.
In Windows 10, the Cortana box or the Windows Search box can search for files and folders on your PC. By default, the search includes files and folders in your profile folder (C:\Users\[user name]) like the Desktop, documents, pictures, and downloads.
You may not want all your files and folders to be included in the search. Maybe you have some private files and you don't want them appearing in the search results. Preventing a folder from appearing in the search results is referred to as deindexing it.
Today, we'll show you how to deindex a folder so it won't appear in the search results in File Explorer or in the Cortana box or Search box on the Taskbar.
Hide Files & Folders from Search Results in Windows 10
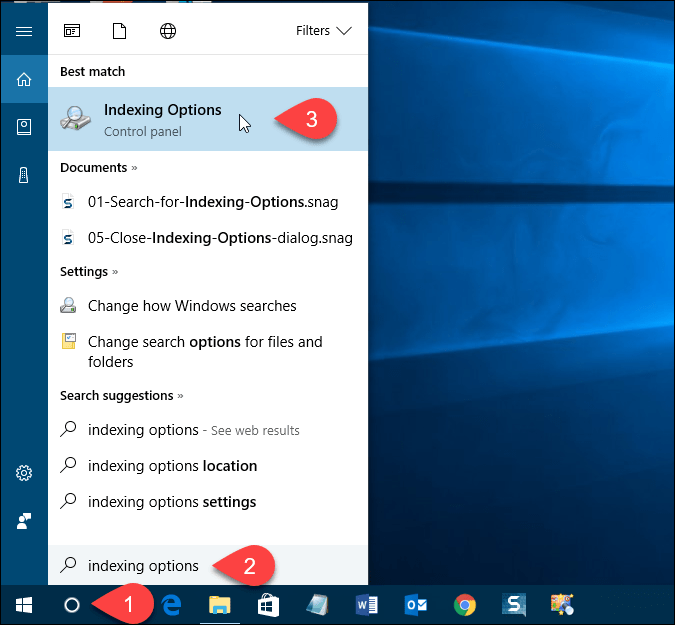
To begin, click the Cortana or the Search icon on the Taskbar and type "indexing options". Click Indexing Options under Best match.
Modify Included Locations
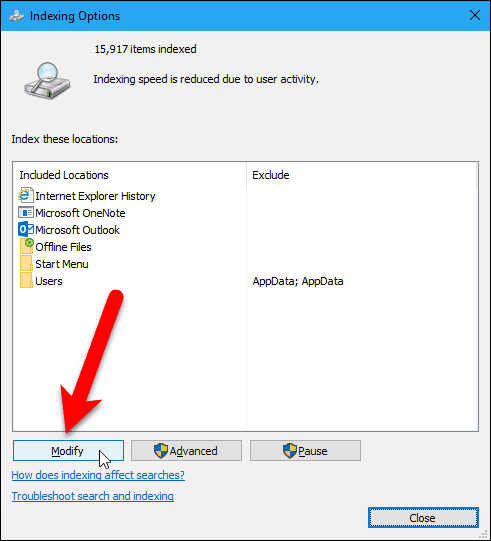
The Included Locations are listed on the Indexing Options dialog box. To hide files and folders from search, click Modify.
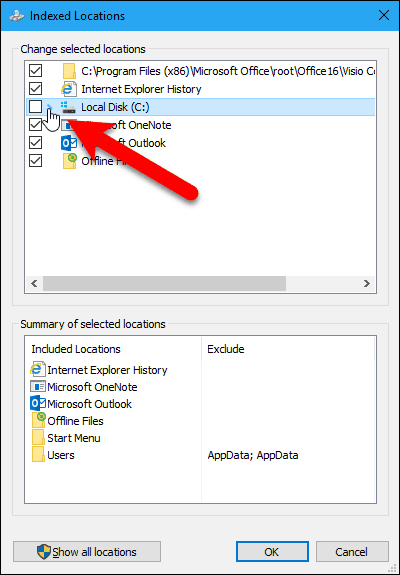
All the folders that are included in the search are checked in the Change selected locations box on the Indexed Locations dialog box.
To find the folder you want to hide from the search, click the arrow next to the Local Disk (C:), or other drive.
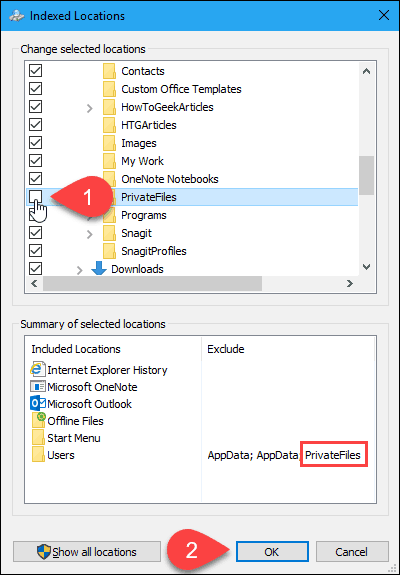
In the folder tree, navigate to the folder you want to hide and uncheck the box for that folder.
NOTE: You can only hide a file by unchecking the folder that contains it. So, if you have specific files you want to hide that may be in the same folder as other files you don't want to hide, move that file to a new folder. You may want to create a folder to contain all the files you want to hide, so you can just hide that folder.
The folder you unchecked is added to the Users folders in the Summary of selected locations box.
Click OK.
Rebuild the Index
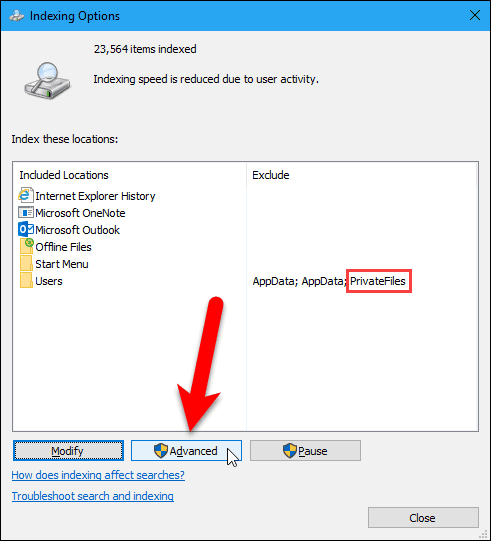
Now, we need to rebuild the index to exclude the selected folder. Back on the Indexing Options dialog box, click Advanced.
NOTE: Notice that the folder you chose to hide is listed in the Exclude column on the Indexing Options dialog box.
You need administrative rights to access advanced indexing options. So, enter your account password if prompted.
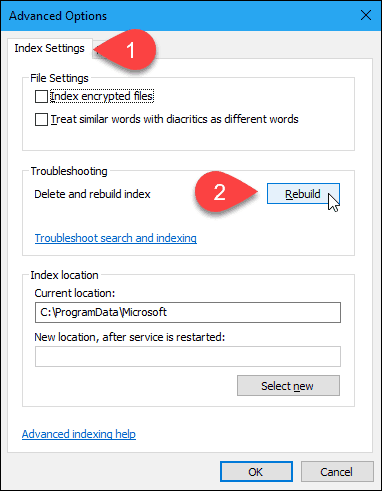
On the Advanced Options dialog box, click Rebuild in the Troubleshooting section.
Note that rebuilding the index can also fix problems with Windows search.
A dialog box displays warning you that rebuilding the index might take a long time to complete. Click OK.
While the index is rebuilding, you might see the folder you chose to hide show up in the search results. You may have to wait a while depending on how many files and folders you have on your hard drive.

Click Close on the Indexing Options dialog box.

And that's all there is to it! Your folders will now be excluded from search results. This includes when you have Windows 10 search through file contents.

How To Hide Apps From Searching Windows 10
Source: https://www.groovypost.com/howto/hide-files-folders-from-search-windows-10/
Posted by: owensthatimed.blogspot.com

0 Response to "How To Hide Apps From Searching Windows 10"
Post a Comment