Marvelous Designer 7 Chalk Tool

Review of Marvelous Designer 7 Features
The Most Useful new features in Marvelous Designer 7:
- Marvelous Designer stitch tool
- Marvelous Designer zipper tool
- Marvelous Designer to Sansar bridge
- Marvelous Designer to Zbrush bridge
- Offset internal lines along curves feature
Other new features in MD7:
- Marvelous Designer "Flattening" tool
- 3D Line Avatar & Garment 3D Line tools
- 3D Baselines (annoying lines IMO)
- Marvelous Designer segment dart tool
- Smart Guides
- Animation enhancements (ability to change pins during animation and animate wind).
- Minor changes to the texture transform tool.
- Custom Camera views and camera settings.
- "Select All with Same Property" option.
- Ability to script in Marvelous Designer.
Marvelous Designer 7 feature Review Summary:
In previous versions of Marvelous Designer there were major, exciting updates such the cut tool, the symmetry tool, the ability to delete avatars etc.
These features significantly sped up the process of making clothes.
While Marvelous Designer 7 has some nice new additions, most of the features aren't vital and don't significantly speed up the workflow/clothes making process.
The biggest time-saving tools are the stitching tools and the zipper tools.
Marvelous Designer 7 simulation speed improvement:
I'm very happy to see simulation in Marvelous Desigenr 7 is faster than it was in Marvelous Designer 6.
In MD6 on my computer, it was very slooow to simulate clothing at Particle Distance 3. Now in Marvelous Designer 7, it simulates quite a bit faster.
However, I've also noticed that new features such as the zippers, flattening, 3D Line Tools cause my computer to work really hard (like when it's rendering a million poly model in Keyshot), huff and puff (even when the clothes are super basic and at Particle Distance 20). The new tools also cause MD to freeze and crash a lot.
Overall, I find MD7 rather unstable.
Also, after MD crashes, it "recovers" an autosave – however, the autosave only contains the avatar and not the clothes!
Hopefully, these issues will be resolved soon!
Marvelous Designer 7 to Sansar Bridge Review:
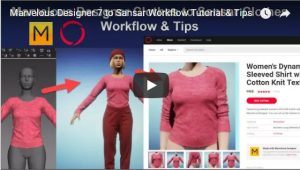
One of the major new additions to Marvelous Designer 7 is the bridge to Sansar.
Sanar was created by SecondLife creators, so it will probably be a big thing at some point.
With the Marvelous Designer to Sansar bridge, you can export clothes from MD and import them straight into Sansar.
Sansar auto-rigs the clothes during conversion.
There's no need to rig the clothes manually, do retopology etc.
Just export and import and list the clothes for sale.
If you want to make simple, dynamic clothing for sale in Sansar marketplace, it may be worth upgrading to Marvelous Designer 7.
The Marvelous Designer to Sansar bridge will enable you to very quickly create simple Sansar clothes for sale.
Note I said "simple". Sansar greatly reduces the detail of Marvelous Designer garments. Layered clothes and complex clothes cause issues in Sansar simulation.
Check out our article with a detailed review of the Marvelous Designer to Sansar bridge, it's limitations, issues, and step-by-step tutorials on how to convert MD garments to Sansar clothes.
Marvelous Designer to ZBrush GoZ Bridge
Marvelous Designer users now have the ability to export MD clothes to ZBrush.
Whenever you change your MD garment, you can update the ZBrush model with one click of the GoZ button.
(Note: I'm not sure if the GoZ action will override any ZBrush sculpting you've done on your model so be sure to test it before spending a lot of time sculpting on your model.
Additionally, ZBrush users have reported errors and bugs in the GoZ bridge from MD to ZB.)
Marvelous Designer's official GoZ demonstration video:
How to use the Marvelous Designer 7 Topstitch Stitching Tool
With the new Topstitch tool in Marvelous Designer 7, you can create realistic stitching lines anywhere you want on your garment.
You can stitch along the edges of the patterns or along internal shapes/internal lines.
This is a great, fast way to create stitching lines around pockets, hems, and decorative stitching strips and stitched text.
In previous versions of Marvelous Designer, one would have to create stitched graphic overlays to emulated the stitching effect.
The Marvelous Designer 7 stitches created with the Topstitch tool are 3dimensional which adds great realism to clothes.
Learn all about the Topstitch tool and how to use it to create stitching in Marvelous Designer 7 :
How to use the Marvelous Designer 7 Zippers Tool
In Marvelous Designer 7, you can easily create zipper strips and zipper pullers/sliders using their new zipper tool.
Watch the video tutorial below to learn how to create zippers in Marvelous Designer 7.
Zipper Troubleshooting tips:
Sometimes, when reversing the Marvelous Designer zipper's direction, the zipper puller turns on its side or gets gobbled by the fabric.
The best way to fix this is to delete the zipper and redo it in the desired direction, instead of selecting "Reverse Zip Direction". (Best to avoid this function for now).
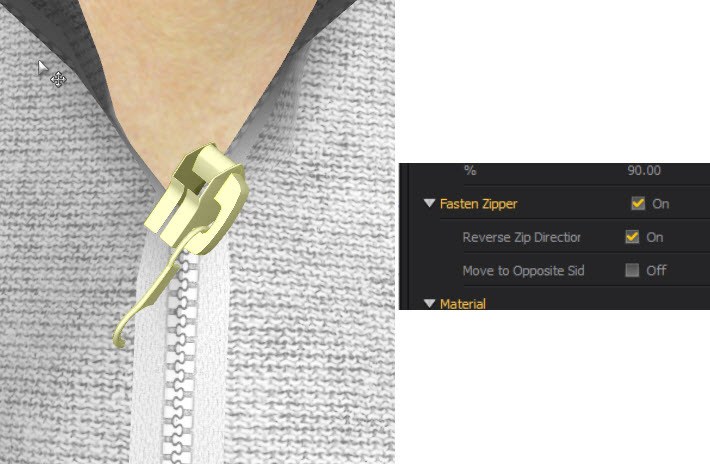
Marvelous Designer 7 Reverse Zipper Direction
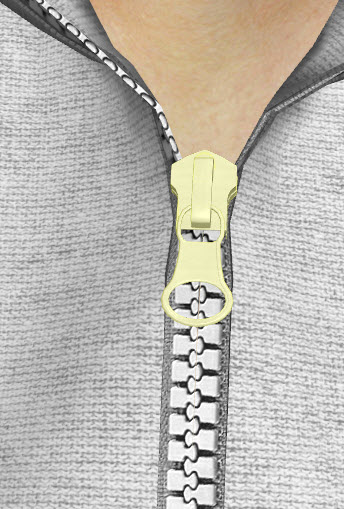
Marvelous Designer 7 Zipper Example with the "Reverse Zip Direction" turned Off:
How to create zippers without the new Marvelous Designer zipper feature?
If you want to create Sansar clothes which have zippers, you'll need to use the Marvelous Designer 7 zippers tool, since imported OBJs (such as zipper models) won't get exported into Sansar.
Otherwise, if making clothes for Sansar is not on your to-do list, if you have an older version of Marvelous Designer, you can create zipper strips by simply creating 2 thin patterns (as shown in the free tutorial video below), sewing them onto your clothes and applying a zipper strip texture onto them.
As for the zipper slider/puller, you can import a zipper puller OBJ model (which you modeled, bought/downloaded from a 3D marketplace, or our free zipper pullers you can download here and our free seamless zipper textures) as an additional avatar into your project.
Then you use the gizmo to move the zipper puller 3D model into place on your garment.
However, this method does take a bit longer than using the Marvelous Designer 7 zipper tool.
What does the New "3D Line" Tool do?
With the new "3D Line (Avatar)" tool, you can draw lines on your avatars which you can use to extract clothing patterns (as mentioned below).
With the new "Line (3D Garment)" tool, you can draw lines on your garments directly in the 3D Garment window.
You can use these lines as guides how to shape/cut your clothing patterns or create shapes you can cut out (a similar but far more basic version of internal lines).
Previously, if one wanted to cut out shapes in the clothes or create patterns/internal shapes one could either use the (very cool) Chalk tool in the 3D Garment window (the chalk tool is now gone in MD7) or create internal lines/internal shapes on the 2D Patterns.
Personally, I think it's a terrible shame they removed the Chalk tool as it was much easier and faster to use than the 3D Line tool.
The 3D Line tool cannot create round shapes or curved edges (which is a big shame).
If you want to create circular holes, rounded internal lines/rounded pockets/rounded piping lines, or cut your clothes along a curved line, it's best to use the internal line tool on your patterns in the 2D Pattern window.
Watch the tutorial below to see a demonstration of how the "Line (3D Garment)" tool can be used on garments:
Here's a video demonstrating how to use the Chalk tool in Marvelous Designer 6 instead of the MD7 Line tools:
Marvelous Designer Flattening Tool Feature Review and Tutorial
The new Marvelous Designer 7 "Flattening" tool is positioned as a way to easily create clothes by simply drawing out the desired shape on the avatar's body and then creating patterns from it.
While it may work in some cases, I find using the Flattening creates poor results and actually more work cleaning the generated patterns up than creating clean, symmetric patterns with the pattern tools.
In order to use the Flattening tool to generate patterns, you first need to draw out lines on the avatar's body with the "Line (Avatar)" tool.
You cannot create curves with this tool. If you want to create a basic curve, you'll need to create a whole load of segment points (which often results in wobbly, lumpy pattern edges).
Drawing simple square patterns with the 3D Line tool is possible, but drawing out more complex designs with clean edges on an avatar's body is difficult since the body is not a flat surface.
The "Flattened" pattern on the body is not the final result…
Even if you manage to draw out your desired pattern shape on the avatar's body, after sewing and simulating, you'll often find the clothes look completely different (with loose parts, lumpy parts, saggy fabric parts etc.) than your desired, hoped-for attempt.
Working to fix up the "Flattened" pattern often takes far longer than creating a pattern from scratch.
"Flattened" patterns often have way too many segment points and curve points along their edges which create lumpy (worse than beginner style) clothes.
In order to get a nice result with this Marvelous Designer Flattening tool, you'll need to understand how to make patterns and how to modify them to get rid of issues or to change the shape and drape.
In short, personally, I haven't found the "Flattening" tool useful. It can be extremely frustrating working with it.
Here's an example of a simple cuff created with the Flattening tool:
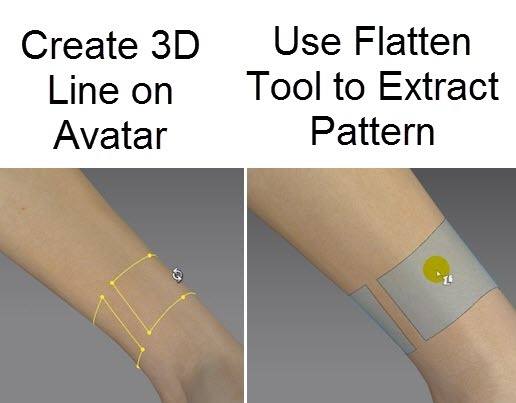
Marvelous Designer Flattening Tool Step 1 and Step 2 (Total time: 7 minutes)
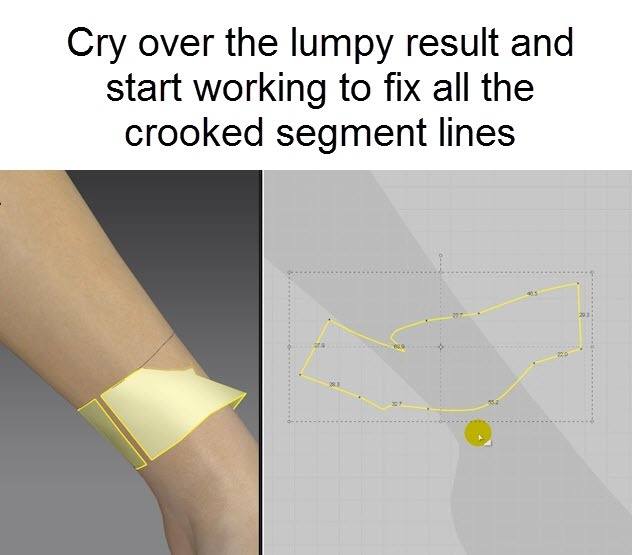
Marvelous Designer Flattening Tool Step 3: Final Result
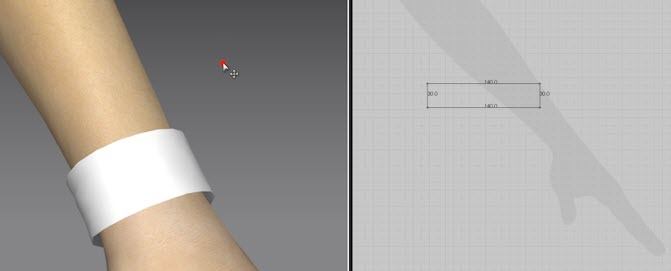
Marvelous Designer Flattening Alternative – Create a simple cuff with a square pattern (Total time: 20 seconds)
Here's an example of the same exact 3D line shape flattened twice with different pattern results:
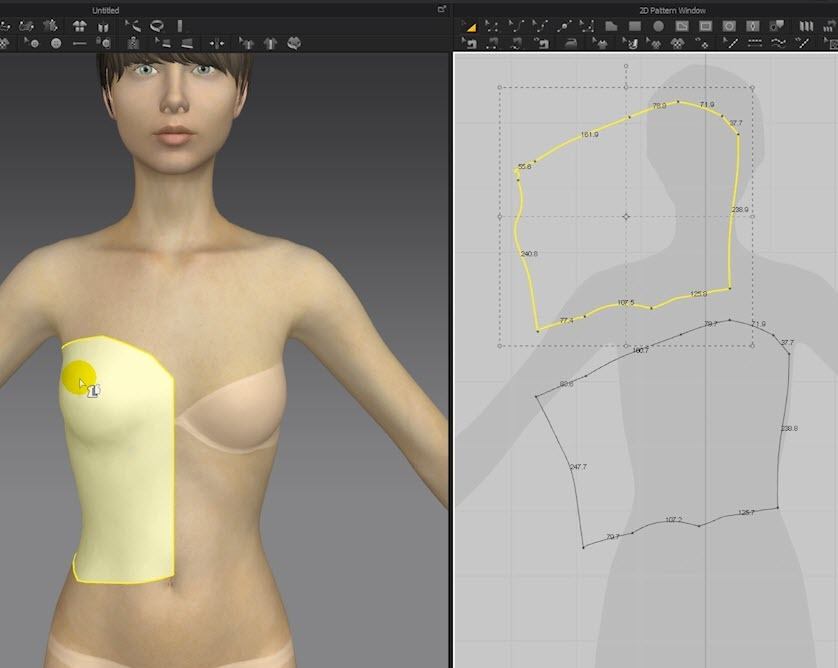
Marvelous Designer 7 Flattening Tool Example
Here's an example of an attempt at a simple, square-strapped sleeveless shirt using the Flattening tool:
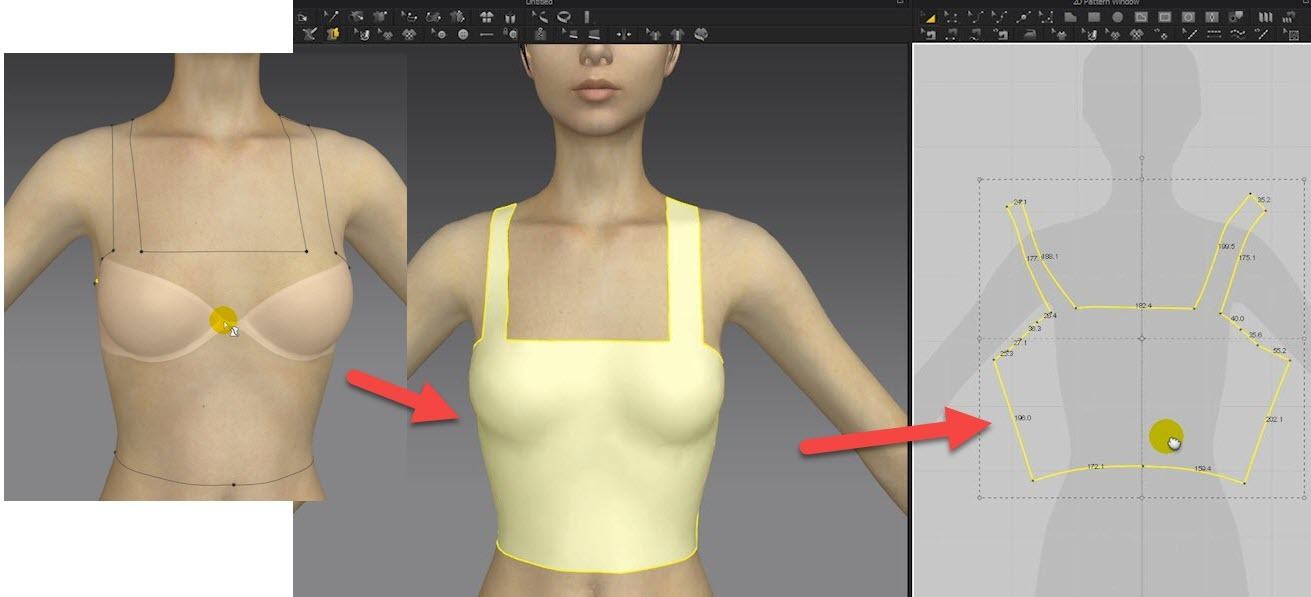
Marvelous Designer Flattening Review
Here's my video review and tutorial how to use the Marvelous Designer 7 Flattening Tool and Avatar Line Tool:
Marvelous Designer Smart Guides (2D Pattern Window)
The Smart Guides are pink lines which appear when you move your pattern and the edge of the pattern lines up with another pattern in your scene.
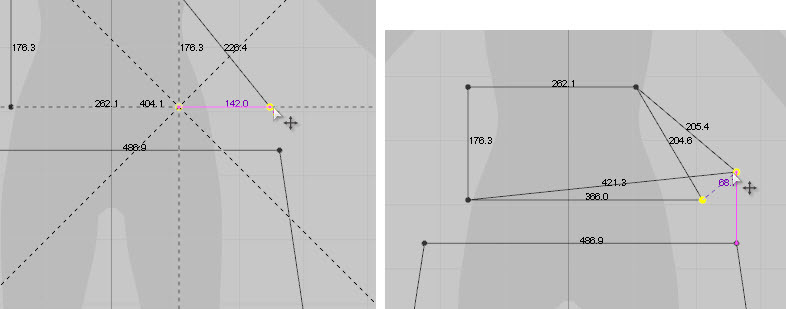
Marvelous Designer 7 Smart Guides
You can turn the Smart Guides on and off by right-clicking in the 2D Pattern Window and selecting or deselecting "Smart Guide".
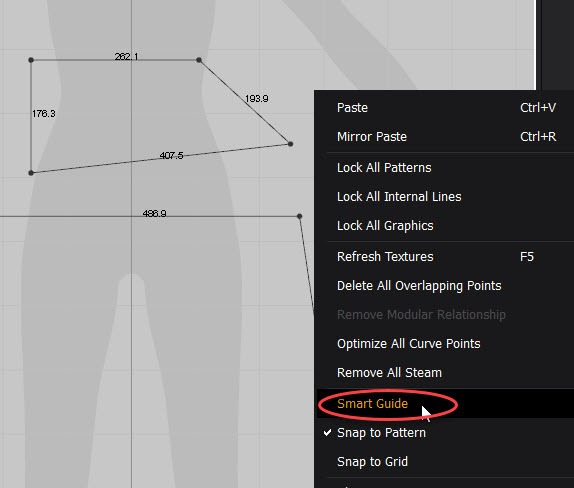
Marvelous Designer Smart Guide Turn on or off
Offset internal lines along curves features
This new feature enables you to offset a segment line as an internal line or to offset an internal line along a curved pattern edge.
This is a great way to quickly create pleated skirts.
See Marvelous Designer's official feature demonstration video:
How can this be done in earlier versions of Marvelous Designer?
Create segment points at the desired distance along the curved pattern edge and along the upper pattern's edge. Then create internal lines from one segment point to the other (you can also copy paste internal lines to save time).
Segment Darts Feature
With this new Marvelous Designer 7 tool you can create darts around segment points on the outer edges of your patterns.
How to add a segment dart? First, create a segment point using the Split Line/Add Point tool.
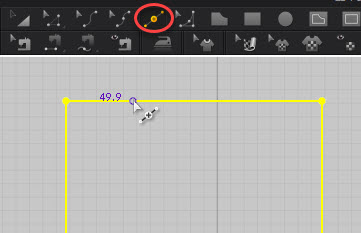
Add Segment Point
Next, right-click on that segment point using the "Edit Pattern" tool and select "Add Dart".
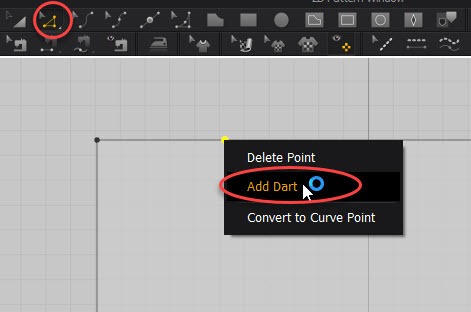
Add Segment Dart
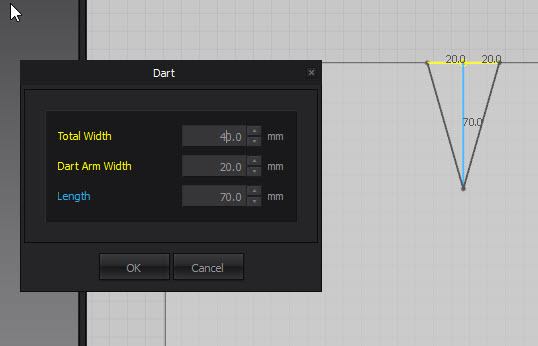
Edit Segment Dart Settings
Lastly, edit the segment dart settings, make the dart as wide and as tall as you wish and then click "OK".
While this is a nice feature to create segment darts faster, you can achieve the same result in older versions of Marvelous Designer with only a few additional steps.
See this tutorial how to create segment darts in older versions of Marvelous Designer.
What is the "3D Baseline" (that blue/purple line on my clothes)?
When you merge symmetric patterns or delete darts in Marvelous Designer 7, you'll get a permanent, non-deletable "3D Baseline" (that thin purple blue line) on your garment and on your patterns.
With symmetric patterns, even if you delete part of your pattern, modify it, then unfold it again, the 3D Baseline will always be in the center where you merged the patterns together.
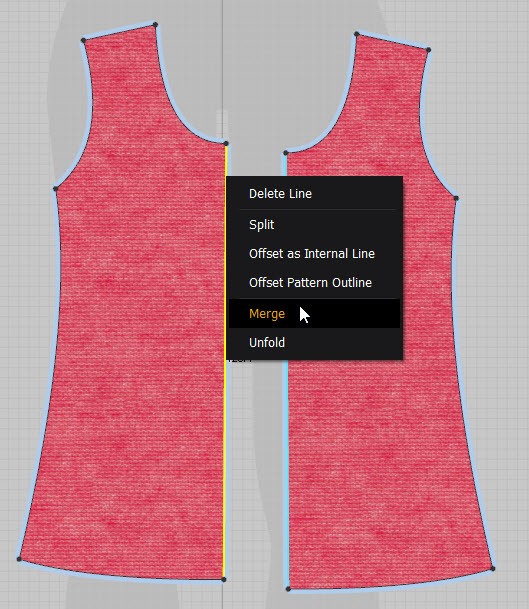
Marvelous Designer Merge Symmetric Patterns
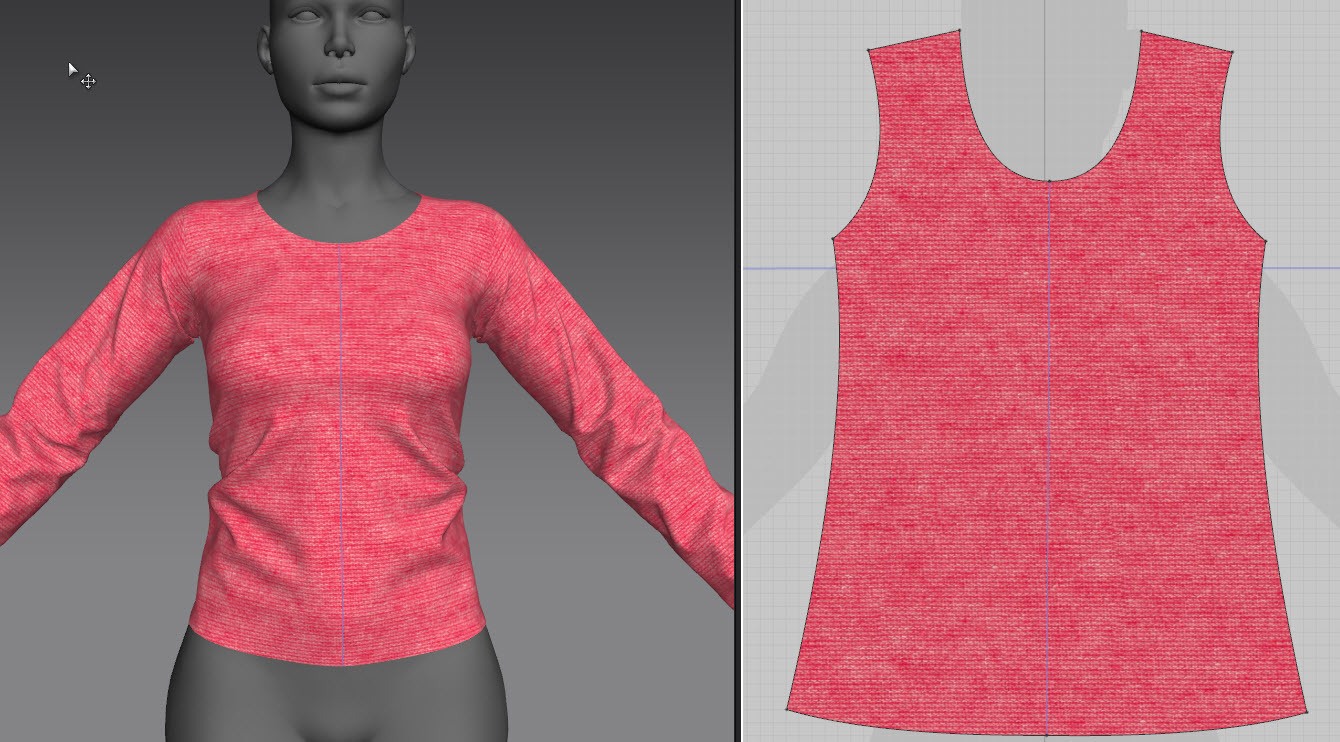
Marvelous Designer 3D Baselines purple blue center line
If you want to render in Marvelous Designer (export a screenshot of your garment) the 3D Baseline can be very annoying.
Here is how to hide the 3D Baselines in the 3D Garment window:
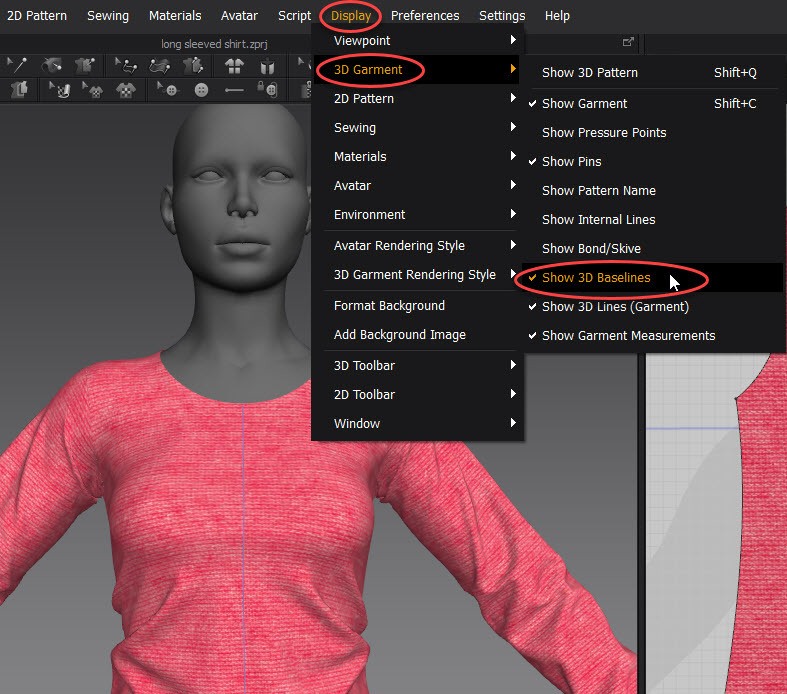
Marvelous Designer 3D Garment Show Baseline
Alternatively, you can simply click on this 3D Baseline icon to show/hide 3D Baselines in the 3D Garment window:
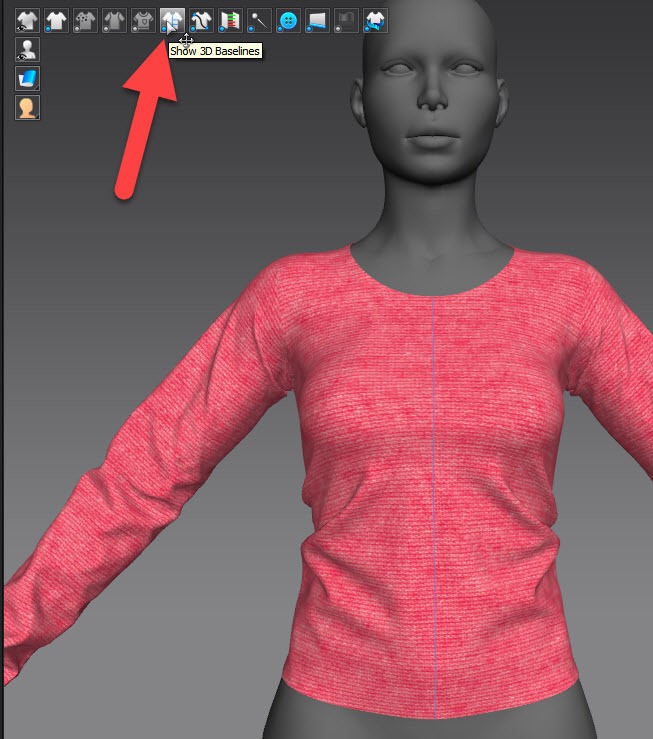
Marvelous Designer 3D Garment Hide/Show 3D Baselines
(Note: Currently on some computers there's a bug which doesn't enable you to hide 3D Baselines in the 3D Garment window.)
Here is how to hide the 3D Baselines in the 2D Pattern window:
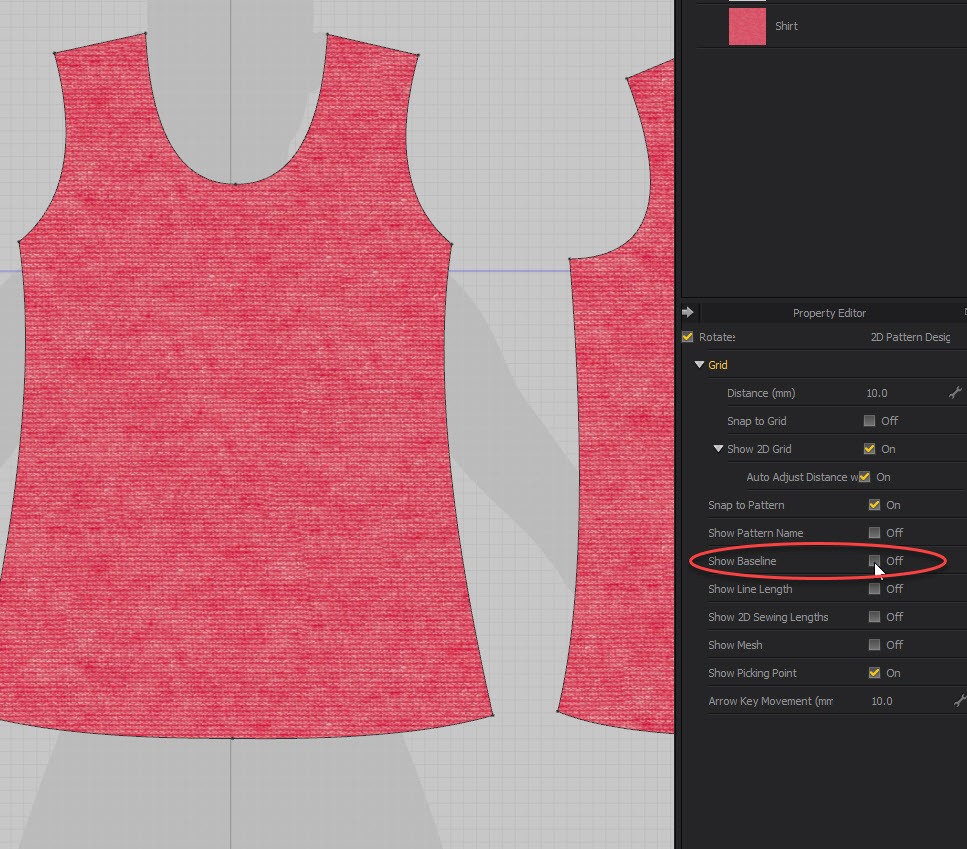
Marvelous Designer 2D Pattern Window How to Hide 3D Baselines
Marvelous Designer 7 Line Tack Tool
With the Line Tack tool you can create tack strips and tack the clothes to each other or to the avatar.
Think of it as a way to sew clothes to the avatar or sew clothing layers to each other without using thread.
When would you want to use this new Marvelous Designer 7 Line Tack tool/feature?
Well, if there are certain parts of your clothes which you don't want to/can't sew for some reason to each other, but you want them to stay stuck together, this could be a way to achieve it.
It could be used to "sew" headbands onto avatar's heads to keep them from moving during animation or special problematic clothes.
Also, the Line Tack tool creates a very thin tacking line (like a thin seam).
However, if you want to pin down a large strip of fabric (such as a cape's collar, waistband etc.) or a specific part of the clothing, then it's better to use the box pinning/lasso pinning tool instead. The pinning tools also enable you to create any shaped pinned area instead of just a thin pinned strip.
(Remember, to be able to use pins during an animation, make sure to right-click on the pinned area and say "attach pins to avatar".)
In my opinion, the Line Tack tool isn't really needed.
If your clothes are slipping off your avatar during an animation, that's because you either didn't design the clothes well or due to your physical property settings.
If the skirt slips off the avatar, you should look into the reason why this is happening and fix it (add a tight waistband, add some elastic etc.) instead of just trying to cover the issue up by "sewing" the skirt onto the avatar.
If you're going to animate your clothes in Marvelous Designer and want a realistic result, you want your clothes to move realistically with the model when the model moves and not have the sleeves sewn strangely onto the model's wrists (as in MD's example below).
Watch Marvelous Designer's official Line Tack feature demonstration:
Add Background image in 2D Pattern window
If you want to trace a pattern or create Marvelous Designer clothes from a reference image/concept art, you can now import background images into the 2D pattern window.
While it may be useful for loading in reference images, I don't find it very useful for tracing patterns since it's hard to scale the background images to the exact right mm size.
Watch my tutorial on how to use the change 2D pattern window background image feature:
An easier way to trace patterns, in my opinion, is to simply load in the pattern texture you want to trace, apply the pattern texture onto a large square background pattern and use the texture transform tool to scale the pattern for tracing texture to the exact right mm size.
Once it's the right size, use your pattern drafting tools to replicate the pattern over it.
See this video how to trace patterns in Marvelous Designer:
Marvelous Designer 7 New Texture Transform tool
The texture transform tool in Marvelous Designer 7 looks slightly different than in previous versions and works a little differently as well.
Here's how to use the new texture transform tool in Marvelous Designer 7:
"Where are the default avatars, hairs, and shoes in Marvelous 7?!"
In Marvelous Designer 7 you can no longer customize and import their default avatars from the "Avatar Editor".
The "Avatar Editor" now only deals with bounding volumes, arrangement points, and avatar measurements.
To import a Marvelous Designer default avatar, you need to open the "Library" tab and then navigate to the "Avatar" folder.
Double-click on the avatar you want to load it into Marvelous Designer.
To change or import avatar's hair or shoes, go to the Hair or Shoes folders and double-click on the item you want to load in.
![]()
Marvelous Designer 7 Default Avatars Location
"Delete Hair/Shoes" Marvelous Designer 7 feature
If you want to delete the shoes the default Marvelous Designer avatar came with, right-click on a shoe and select "Delete Hair/Shoes".
Repeat with the 2nd shoe.
Make sure you click on the shoe, not on the avatar's leg. With the high-heels, it can be tricky.
If the Marvelous Designer avatar's leg is yellow, that means you didn't select the shoe…
![]()
Marvelous Designer 7 Delete Hair/Shoes Feature
To delete the Marvelous Designer avatar's hair , right-click on the hair and select "Delete Hair/Shoes":
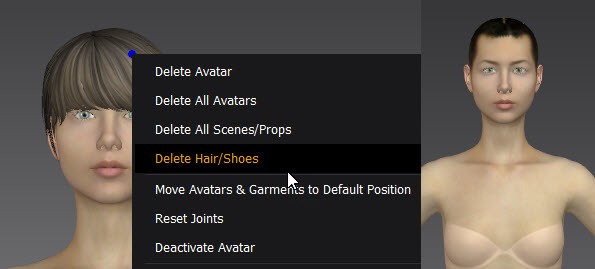
Marvelous Designer 7 Delete Hair
Marvelous Designer Camera Controls, Presets, and Custom Views
In the new MD version, you can now create, save and export/import camera settings and custom views.
The custom views and camera controls can be imported and used in any project regardless of the garment or avatar.
So if you want to get snapshots of all your garments from a certain angle, you can simply import that custom view into each project to see your avatar and clothes from that exact angle.
Watch the tutorial below to learn all about this new feature:
Marvelous Designer 7 new animation features
You can now pause recording animation and add pins, delete pins, move pins, and then continue to record the animation.
Watch the official Marvelous Designer Pin Animation new feature demonstration video:
In Marvelous Designer 7, you can also animate wind. You can change the angle of your wind and the wind settings. You could make the wind rotate around your model (although that isn't very realistic) to show people how the clothing material blows from different sides.
Take a look at the official Marvelous Designer Wind Animation new feature demonstration video:
Select All with Same Property feature
This feature allows you to quickly select all the patterns which have something in common such as all patterns in your scene which have the same fabric applied, the same Particle Distance, or the same layer number (this is the layer number assigned in the Property Editor to control the layering hierarchy of the clothing patterns on your garment).
Simply right-click with any of the pattern editing tools on any pattern in your scene to access this menu option.
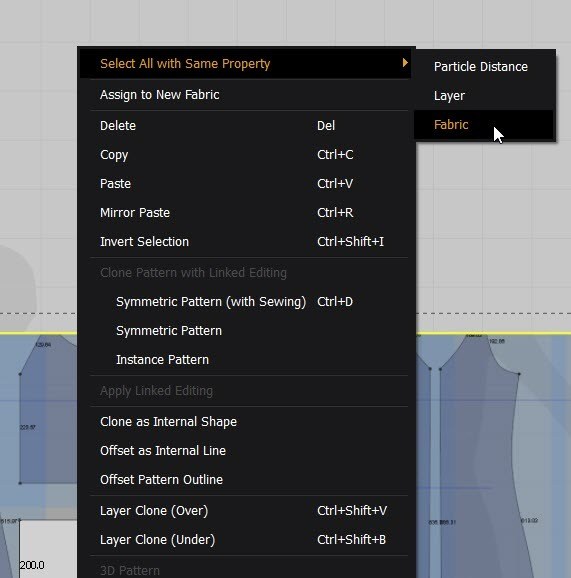
Marvelous Designer 7 Select All feature
We hope our Marvelous Designer 7 feature tutorials helped you! Have a question? Ask us below!
For more details about the new features in Marvelous Designer 7, read Marvelous Designer's manual.
Do you want to quickly and easily learn Marvelous Designer and be able to create any 3D clothing?
Check out our highly-acclaimed "Mastering Marvelous Designer" course.
Not only will you learn to master the MD program (the right way) with a solid grasp of the tools and how to use them, more importantly, you'll learn the principals of making all kinds of clothes, via our easy-to-follow and well-structured Marvelous Designer training.
If you enjoyed reading this article, then please tell your friends about it. This helps us Elves get the word out, so more fellow artists can benefit! All goes hand in hand - Blessings to you the Elves shall send! :)
Marvelous Designer 7 Chalk Tool
Source: https://cgelves.com/marvelous-designer-7-features-video-tutorials-review/
Posted by: owensthatimed.blogspot.com

0 Response to "Marvelous Designer 7 Chalk Tool"
Post a Comment